공기청정기 DIY!!!
요즘 미세먼지로 고통을 받고 있는 가족을 위해 공기청정기 DIY를 해봤다.
먼지센서의 측정기준은 한국환경공단에서 게시한 정보를 기준으로 프로그래밍!!
(LED Bule일경우 좋음, Green일경우 보통, Yellow일경우 나쁨, Red일경우 아주 나쁨)

사진과 같이 시스템을 구성!!

AC FAN과 아두이노 나노보드에 전원을 공급하기 위해서 집에 뒹글고 있던 5V아답터를 분해해 PCB만 사용!!

짜~잔!! 완성
우선, 기존 공기청정기에 사용되는 교체용 원통형 필터를 구매해서, 아두이노 나노에 온도센서, 0.96인치 OLED, 먼지센서, 릴레이(FAN ON/OFF), AC FAN를 부착하여 시스템을 구성한 후, 원통형 필터에 얹혀서 만들어 봤다.
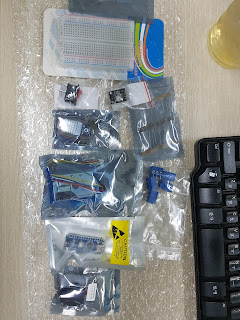
먼저, 에듀이노와 ICBanq 등에서 필요한 부품을 구매...
(공기청정기용 교체용 원통형 필터, 브레드보드, 3색 LED, 온습도 센서, 먼지센서, 릴레이, AC FAN, OLED 패널, 아두이노 나노)

(LED Bule일경우 좋음, Green일경우 보통, Yellow일경우 나쁨, Red일경우 아주 나쁨)


짜~잔!! 완성
실제, 프로그래밍한 소스는 이하 참조...
---------------------------------------------------------------------------------------------------
/*
* 온습도 측정 센서용 Header
* Adafruit Unified Sensor Library: https://github.com/adafruit/Adafruit_Sensor
* DHT Sensor Library: https://github.com/adafruit/DHT-sensor-library
*/
#include <Adafruit_Sensor.h>
#include <DHT.h>
#include <DHT_U.h>
#define DHTPIN 2 // Pin which is connected to the DHT sensor.
#define DHTTYPE DHT22 // DHT 22 (AM2302)
/*
* 온습도 센서 변수 선언
* 참고 : https://learn.adafruit.com/dht/overview
* 참고 : https://github.com/adafruit/DHT-sensor-library
*/
DHT_Unified dht(DHTPIN, DHTTYPE);
//uint32_t delayMS;
/*
* SSD1306 0.96인치 OLED Display 라이브러리 선언
* 참고 : https://github.com/adafruit/Adafruit-GFX-Library
* 참고 : https://github.com/adafruit/Adafruit_SSD1306
*/
//#include <SPI.h>
//#include <Wire.h>
//#include <Adafruit_GFX.h>
//#include <Adafruit_SSD1306.h>
#include <Wire.h>
#include <OzOLED.h>
/*
* u8g 관련 라이브러리 선언(SSD1306 0.96인치 OLED 컨트롤)
*/
#include "U8glib.h"
U8GLIB_SSD1306_128X64 u8g(U8G_I2C_OPT_NONE); // HW SPI Com: CS = 10, A0 = 9 (Hardware Pins are SCK = 13 and MOSI = 11)
#define DELAY 3000
/*
* 먼지센서 pin 변수 선언
*/
const int DUST_LED = 12; // 먼지센서 LED #pin
const int readPin = 0; // 먼지센서 신호 입력 #pin(analog)
/*
* 3색 LED pin 변수 선언
*/
const int RED = 5; // RED
const int GREEN = 6; // GREEN
const int BLUE = 7; // BLUE
/*
*릴레이 pin 변수 선언
*/
const int relayPin = 10; // AC FAN구동용 릴레이 #pin
////////// Sensor 사양, T = 10ms(Pulse-driven wave form)
///////// 참고 : http://arduinodev.woofex.net/2012/12/01/standalone-sharp-dust-sensor/
/*
* Sampling time 0.28 ms
*/
const float SamplingTime = 280;
/*
* Wating time 0.04 ms
*/
const float DelayTime = 40;
/*
* OFF time 9.680 ms
*/
const float SleepTime = 9680;
////////// T = Sampling tinem + wating time + OFF time = 10ms
float dustVal = 0.0; // 임시변수
/*
* 온습도센서 관련 임시변수
*/
sensors_event_t event;
float t=0.0;
float h=0.0;
int times = 0;
/*
* 함수선언 : 센서값 읽어 들이기
*/
float dustRead();
/*
* 함수선언 : 먼지 크기 계산
*/
float calculate();
/*
* 함수선언 : 0.96인치 OLED Display
*/
void oledDisplay(float dust, float t, float h);
void setup() {
/*
* 0.96인치 oled 디스플레이 초기 설정
*/
if ( u8g.getMode() == U8G_MODE_R3G3B2 ) {
u8g.setColorIndex(255); // white
}
else if ( u8g.getMode() == U8G_MODE_GRAY2BIT ) {
u8g.setColorIndex(3); // max intensity
}
else if ( u8g.getMode() == U8G_MODE_BW ) {
u8g.setColorIndex(1); // pixel on
}
else if ( u8g.getMode() == U8G_MODE_HICOLOR ) {
u8g.setHiColorByRGB(255,255,255);
}
pinMode(relayPin,OUTPUT); // 릴레이 출력 설정
////////// 온습도 센서 관련 설정 시작
dht.begin(); // 온습도 센서 시작
sensor_t sensor;
dht.temperature().getSensor(&sensor);
/*
* Debgging code
*/
Serial.println("------------------------------------");
Serial.println("Temperature");
Serial.print ("Sensor: "); Serial.println(sensor.name);
Serial.print ("Driver Ver: "); Serial.println(sensor.version);
Serial.print ("Unique ID: "); Serial.println(sensor.sensor_id);
Serial.print ("Max Value: "); Serial.print(sensor.max_value); Serial.println(" *C");
Serial.print ("Min Value: "); Serial.print(sensor.min_value); Serial.println(" *C");
Serial.print ("Resolution: "); Serial.print(sensor.resolution); Serial.println(" *C");
Serial.println("------------------------------------");
dht.humidity().getSensor(&sensor);
/*
* Debugging code
*/
Serial.println("------------------------------------");
Serial.println("Humidity");
Serial.print ("Sensor: "); Serial.println(sensor.name);
Serial.print ("Driver Ver: "); Serial.println(sensor.version);
Serial.print ("Unique ID: "); Serial.println(sensor.sensor_id);
Serial.print ("Max Value: "); Serial.print(sensor.max_value); Serial.println("%");
Serial.print ("Min Value: "); Serial.print(sensor.min_value); Serial.println("%");
Serial.print ("Resolution: "); Serial.print(sensor.resolution); Serial.println("%");
Serial.println("------------------------------------");
//delayMS = sensor.min_delay / 1000;
////////// 온습도 센서 관련 설정 끝
pinMode(DUST_LED,OUTPUT); // Sensor LED 출력 설정
pinMode(RED,OUTPUT); // 3색 LED, RED 출력 설정
pinMode(GREEN,OUTPUT); // 3색 LED, GREEN 출력 설정
pinMode(BLUE,OUTPUT); // 3색 LED, BLUE 출력 설정
Serial.begin(9600); // 시리얼 모니터 출력 용 속도 설정
}
void loop() {
dustVal = calculate(); // Dust값 계산해서 읽어오기
/*
* Dust값이 연속 3분 동안 10ug/m3이하일 경우, FAN 가동 OFF, 아니면 FAN 가동 계속 ON
* 목적 : FAN 수명 및 소비전력 관리
*/
// 먼지가 10ug미만일 경우 1씩 증가
if ( dustVal < 15.00 ) {
times = times + 1;
}
else {
times = 0;
}
// times가 100이상(연속 3분)일 경우, 릴레이 OFF 아닐경우, 릴레이 계속 ON
if ( times >= 60 ) {
digitalWrite(relayPin, HIGH); // 릴레이 OFF
}
else {
digitalWrite(relayPin, LOW); // 릴레이 Normal Open (ON)
}
/*
* 먼지크기에 따른 3색 LED 점등
*/
if(dustVal <= 30.0){
analogWrite(RED, 0);
analogWrite(GREEN, 0);
analogWrite(BLUE, 255);
//Serial.println("...BLUE"); // Debugging code
} else if(30.0 <dustVal && dustVal <=80.0){
analogWrite(RED, 0);
analogWrite(GREEN, 255);
analogWrite(BLUE, 0);
//Serial.println("...GREEN"); // Debugging code
} else if(80.0 < dustVal && dustVal <=150.0){
analogWrite(RED, 255);
analogWrite(GREEN, 155);
analogWrite(BLUE, 0);
//Serial.println("...YELLOW"); // Debugging code
} else {
analogWrite(RED, 255);
analogWrite(GREEN,0);
analogWrite(BLUE, 0);
//Serial.println("...RED"); // Debugging code
}
/*
* 온습도 값 읽어오기
*/
dht.temperature().getEvent(&event);
if (isnan(event.temperature)) {
t=0.0;
} else {
t=event.temperature;
}
// Get humidity event and print its value.
dht.humidity().getEvent(&event);
if (isnan(event.relative_humidity)) {
h=0.0;
} else {
h=event.relative_humidity;
}
oledDisplay(dustVal, t, h);
// 사용변수 초기화
dustVal = 0.0;
t=0.0;
h=0.0;
delay(DELAY);
}
/*
* 1. S-Led ON
* 2. 샘플링(280us)
* 3. 센서 아날로그 신호 읽어오기
* 4. waiting(40us)
* 5. S-Led OFF
* 6. 센서구동 정지(9680us)
*/
float dustRead() {
float val = 0.0;
digitalWrite(DUST_LED, LOW); // LED ON
delayMicroseconds(SamplingTime);
val = analogRead(readPin);
delayMicroseconds(DelayTime);
digitalWrite(DUST_LED, HIGH); // LED OFF
delayMicroseconds(SleepTime);
return val;
}
/*
*1. 센서 볼트값 맵핑
*2. 볼트값에 비례한 먼지 크기 계산
*/
float calculate() {
float dustVlolume = 0.00, V = 0.00;
V= dustRead()*(5.0/1024.0);
dustVlolume = ((0.17*V) - 0.1)*1000;
if(dustVlolume < 0.00){
dustVlolume = 0.00;
}
return dustVlolume;
}
void oledDisplay(float dust, float t, float h) {
u8g.firstPage();
do{
u8g.setFont(u8g_font_unifont);
u8g.setPrintPos(0,10);
u8g.print(t);
u8g.print("*C");
u8g.print(" , ");
u8g.print(h);
u8g.print("%");
u8g.setFont(u8g_font_fub20);
u8g.setPrintPos(30,45);
u8g.print(dust);
u8g.setFont(u8g_font_unifont);
u8g.setPrintPos(80,60);
u8g.print("ug/m3");
} while(u8g.nextPage());
}
---------------------------------------------------------------------------------------------------
3D 프린터만 있었다면, 기구물 구성은 좀더 쉽고 깔끔하게 할 수 있을 텐데.. 하는 아쉬움이 남지만, 다음엔 라떼판다와 7인치 IPS+터치패널를 이용해 안드로이드 OS를 심어서 T-map을 사용할 수 있는 네이게이션을 만들어볼 생각입니다.
댓글
댓글 쓰기